Bow How-Tos
Cut ribbon to desired length.
Classic
As shown on the ribbon swag. We started with a 24-inch length of wide ribbon. (For a different size, make bow on the ribbon spool before cutting.)
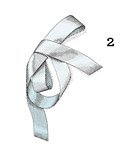
1. Create two loops, one on each side of the ribbon. Cross right loop over left.
2. Knot by passing right loop behind left, under, and up through (make sure ribbon is not twisted or bunched).
3. Pull loops to create a small, smooth knot. Adjust loops, opening them up with your fingers; cut notches in tails.
Rosette
As shown on the napkin ring.We started with a 45-inch length of narrow ribbon.
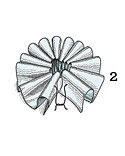
1. Hold four fingers on one hand together, and wrap with ribbon, making certain it lies flat. The fullness of the bow will depend on how many times you wrap it around (we wrapped ours ten times; for larger bows, wrap ribbon around your whole hand). Slide the ribbon off your fingers, and pinch it together at the center. Cut a notch through all layers on each side. Tie a piece of string around the center of the ribbon, slipping it into the notches; pull string taut, and knot.
2. To form the rosette, spread loops outward, and twist, shaping them into a fluffy ball.
Figure-Eight
As shown on the wreath. For the wreath, we started with two 38-inch lengths of wire taffeta.
1. Make loops: Form a loop at one end of ribbon; glue in place.
2. Wind the rest of the ribbon back and forth, forming a figure eight with each layer and making each a little larger than the one before it, until you've created three stacked figure eights. Glue figure eights together at the points where the ribbon crosses. Let dry.
3. Knot the second length of ribbon around the loops at the center; rotate the knot so the smooth side is at the front. Slide 20-gauge wire through knot at back for hanging; trim ends.
Layered Loops
1. Make loops: Bend an 8-inch-long ribbon into a circle, attaching ends with fabric glue. Repeat to create two or three more circles, each ribbon 2 inches longer than the one before it. Pinch each ribbon together at center; put a tiny dab of glue there to secure. To create the topmost loop, wrap a piece of ribbon around your thumb, and glue ends together; if you would like to add tails, notch a length of ribbon at both ends. Stack loops, smallest to largest with tail underneath.
2. To connect loops and tail, wrap them with a short piece of ribbon: Slip it through the topmost loop and wrap around all of the layers; glue its ends together at bottom of bow. Let dry.
Medallion
As shown as ornaments. We started with 1 yard of wide grosgrain ribbon.
1. Make a series of accordion folds (our folds are 1 inch), holding the folds in place with your fingers as you work. Finish with both ends of the ribbon facing the same direction. Thread a needle and knot it, leaving a 1-inch tail. Pass the needle and thread through the layers, about 1/4 inch from the selvage edge.
2. Bring ends of thread together; knot, close to the ribbon. Cut off excess thread. Glue ends of ribbon together, covering the knot. Shift folds so they're evenly spaced.
3. Press the center of the bow to flatten, rotating the folds in one direction.
Sash
As shown on the wreath. To make the sash bow with the extra-long tails, we started with four pieces of satin ribbon: one 16 inches long, one 20 inches, one 24 inches, and one 4 yards (for the tails).
1. Make loops: For each of the three shortest ribbons, fold ends toward the center, overlapping them; secure with fabric glue. Stack loops. Lay the 4-yard piece across the center of the loops, and knot.
2. Rotate knot to back of bow. Trim ends of tails at an angle. Slide 20-gauge wire through knot at back for hanging.
Winged
As shown on the chandelier.
1. Cross left end of the ribbon over right.
2. Knot by passing left end behind right, under, and up through opening (make sure ribbon is not twisted or bunched).
3. Pull on the ends of the ribbon to create a tight, smooth knot.
4. Adjust to desired shape, and notch the ends.
Tuxedo
As shown on the ribbon card holder, the candy tray, and the votives.
1. Fold ends of a piece of ribbon in toward the center, overlapping them; secure with fabric glue. Flatten at center and glue to secure. Cover center with a second piece of ribbon, gluing at back of bow; for a cinched bow, wrap center more tightly.
2. Adjust to desired shape.
Ribbon and Bow Accessory How-tos Petal Bow-Ornament
The petal bow is similar to the medallion bow. For the petal bow, make 2 1/4-inch accordion folds in ribbon (ours is 5/8 inch wide and 45 inches long); end with the raw edges facing down. Pass needle and thread through bottom, about 1/4 inch from edge. Hold together, and pull taut; knot. Spread petals; tie silver twine around thread to hang.
Figure-Eight Ornament
This is made with 15-inch-long, 3/8-inch-wide satin ribbon. Follow instructions on page 102 to make three figure-eight bows, but start with the cut edge at back of bow instead of at front, and make two layers instead of three. Cross and glue two of the bows. Glue a loop of silver twine at the front center. Glue a third bow across the middle, as shown, concealing twine.
Card Holder
This project uses a tuxedo bow.
Tools and Materials
scissors
4-inch-wide ribbon card envelopes
9-mm-wide ribbon fabric glue (such as Magna-Tac 809)
20-gauge wire self-adhesive hook, for hanging
Card Holder How-To
1. Make tail: Cut a 40-inch (or longer) length of wide ribbon. To make an even notch in the bottom, fold ribbon in half lengthwise and cut on an angle from outer edge to fold; unfold. Since you’ll likely be making this before holiday cards arrive, lay out five or six card envelopes along front of ribbon, some horizontally and others vertically, keeping 1/2 inch between them. Lay a narrow ribbon down each side (about 1/2 inch in from edge); trim ends to match angle of notch. With envelopes as your guide, glue narrow ribbons to the wide ribbon between envelopes. Slide envelopes out.
2. With a 25-inch-long wide ribbon, make a 12-inch tuxedo bow; wrap center tightly to cinch bow. At back, knot narrow ribbon around center band, then rotate narrow ribbon so its knot is concealed inside. This will be the loop from which bow will hang.
3. Cinch top of tail: Twist a piece of wire into a loop. Fold top corners under about 1 inch (top edges should be flush); at the same time, press the top center in with your thumbs, forming shape shown. Secure ribbon with dabs of glue, and glue wire to center. Using a removable self-adhesive hook, hang tail first, and then bow.


No comments:
Post a Comment