


 Use paper to give favors colorful details. These ideas use rose and chocolate brown, evoking an earlier era.
Stamp tissue for one-of-a-kind wrapping.

Tissue-Paper Favor How-To
Twisted just so, these treats will stand up on their own.
1. You'll need large, box-shaped candies, such as these Neopolitan coconut squares. Cut two sheets of 71/2-inch square tissue paper in contrasting colors. With brown ink and a rubber stamp in any design you like, decorate one corner of the lighter paper, as shown.

2. Lay with stamped side face down. Stack candies in the corner opposite stamped section. Fold paper against side and then bottom of candies, as if wrapping a gift box.

3. Roll candies up in the tissue, holding them carefully so they don't shift.

4. Twist top of tissue paper above candies to secure -- no tape is needed.

A trio of envelopes encloses sweets and serves as a place card.

Envelope Favor How-To
You'll need hot pink, pale pink, and brown 31/2-by- 5-inch envelopes.
1. Create a template (for making many favors): Trace envelope onto paper; cut out, and make two holes using a 1/8-inch hole punch. Lay template over front envelope; mark holes with pencil.
2. Lay front envelope over other two, staggering so tops show. Using a paper clip to hold in place, punch holes through all three envelopes.
3. Add candies to each envelope; seal.
4. Tie together with ribbon. Print label on a computer (use clip art for fancy designs); affix with a glue stick.


You can find a wide selection of candies in both pink and brown. Of course there are myriad chocolates; and jelly beans, M and Ms, and dragees come in almost every color (food for any palette). Use all one hue, or mix the colors in flavors that go well together.

A cuff of scrapbooking paper secured with clear tape dresses up prewrapped taffy.

![]()
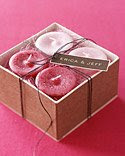
Customize a white box with a brown paper band; votive candles nest in pink wood excelsior (a packing material); a computer-printed label is attached with twine.


No comments:
Post a Comment